

Since its 2016 release, Elementor has quickly risen to the top of the WordPress page builder rankings. Not only can you make beautiful web pages with Elementor. A whole website can be made with Elementor. You can design unique components for a WordPress theme using the theme builder included in the pro edition of Elementor. starting with the Header, Footer, Single post template, 404 page, archive page, Search results page, etc. In this article, We’ll demonstrate how to use Elementor Pro to build an entire website.
Table of Contents
A Brief Intro About Elementor
Just in case you weren’t aware. A page builder plugin for WordPress is called Elementor. By using a page builder, you may design a stunning web page without needing to know HTML or CSS. A visual editor that comes with a page builder, Like Elementor, Allows for drag-and-drop editing.
The base version of Elementor is offered as a freemium plugin. The following are the main features of the pro version, Which costs $49 per year for the cheapest plan.
Theme Builder
Popup Builder
WooCommerce Builder
Marketing Tools
Dynamic Content
Form Builder
Extra widgets
To help you understand more about the benefits of using Elementor Pro, We have written a comparison article between Elementor Free and Elementor Pro.
Preparation
In this example, we will demonstrate how to create a digital agency website. The website will consist of 5 main pages as follows:
Homepage
About page
Contact page
Service page
Clients page
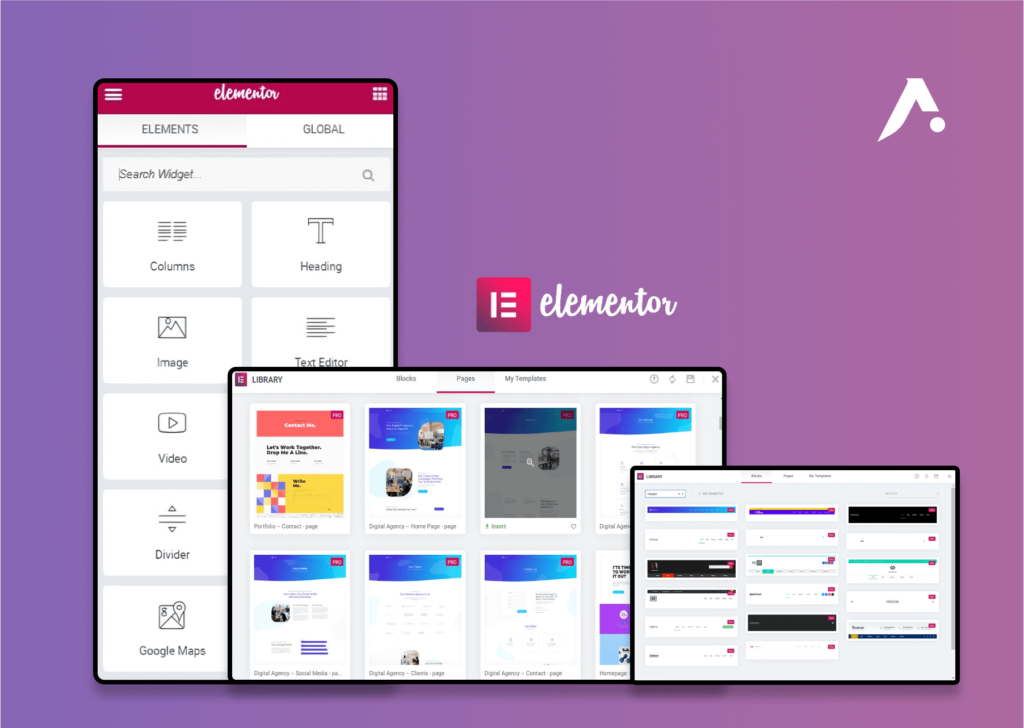
In addition, We’ll design the 404 page, Header, Footer, single post template, and Popup. Template kits are provided by Elementor itself. A collection of Elementor templates with a unified design theme is known as a template kit. A template kit is made for websites in a particular market. For this example, we’ll use the Digital Agency template kit.
You certainly need a name and hosting before you can begin building a website with Elementor. Here are the things you need to get ready to use Elementor to build a website.
Domain+Hosting
A domain is a name that visitors can use to access your website (For example, yourwebsite.com), Whereas hosting—more specifically, Web hosting—is the location where your website is set up. Normally, A.com domain will run you $8 to $13 per year. You can choose a hosting package based on your needs.
Although shared hosting is an option, We strongly advise using managed WordPress hosting because it is made specifically to support WordPress-based websites. A managed WordPress hosting service’s infrastructure, Including the server configuration, Is optimized for WordPress. You don’t have to take care of site optimization and security yourself while using managed WordPress hosting because the associated hosting provider will take care of those tasks for you. One of the well-known web hosts that offers managed WordPress hosting is Bluehost.
Elementor Pro
To design a Custom Header, Custom Footer, and Other theme components like those stated above, You must utilize Elementor Pro. For the pro version of Elementor, There are five plans available. Visit the organization’s website to find out more. You can select the ESSENTIAL plan for $49 a year if you wish to build a website for your own company.
Getting Started
Install WordPress
You can begin building your website as soon as everything is prepared. Since WordPress is the foundation of the website we’re going to build, The very first thing you should do is install it. Depending on the control panel your hosting company offers, There are different thorough instructions for installing WordPress.
You can read this post to learn how to install WordPress if you use SiteGround. You can read this article if you utilize a hosting company that makes use of cPanel.
Install Elementor Pro
You can get Elementor Pro on its official website. You will have access to the ZIP file of Elementor Pro after completing the purchase. To install Elementor Pro to your website, Login to your WordPress dashboard using your username and password. Go to Plugins -> Add New. Click the Add New button on the top side and select the ZIP file of the Elementor Pro you have downloaded and click the Install Now button to install it on your WordPress.

Activate the plugin right away once installed.

You will be redirected back to the WordPress plugin manager after activating the Elementor Pro plugin, Where you will notice a Connect & Activate button in the upper-right corner. To activate your Elementor Pro, Click this button.

Note :
Elementor Pro requires Elementor Free. You can download Elementor Free on the official plugin directory of WordPress.
Set the Site Logo, Icon, Title, and Description
You can establish the necessary components, Such as the Logo, Icon, Title, and Description, Before building your website’s main pages and custom templates with Elementor. While you can set these components up later, Doing so will be much more beneficial because they will be necessary for the subsequent steps.
We strongly advise using Site Settings rather than the theme customizer when setting the site logo, Icon, Title, and Description when building a website using Elementor. The ability to change themes in the future will be much facilitated by this. Even if you switch themes, Nothing you’ve set in Site Settings will be lost.
To access Site Settings of Elementor, Enter to the Elementor editor by editing a page. Once the editor opens, Click the three-line icon on the top-left corner and select Site Settings.

Click the Site Identity menu on the SETTINGS Block.

Simply set the site Logo, Icon, Title, and Description on the respective fields. Don’t forget to click the UPDATE button to apply the changes.
Create the Core Static Pages of Your Website
You can begin developing the static pages for your website as soon as Elementor Pro is activated. Our homepage, About page, Contact page, Clients page, and Services page will be the static pages we design.
— Homepage
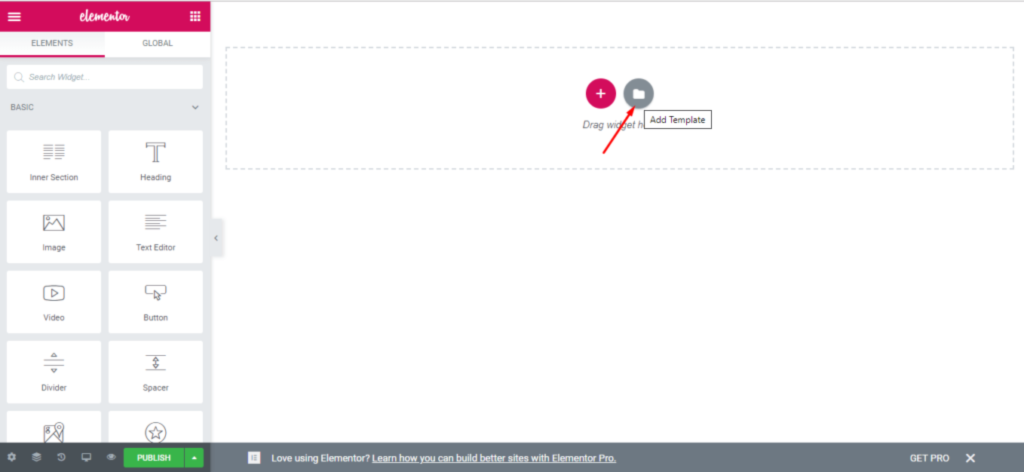
Create a page (Pages -> Add New) and edit it with Elementor. Give this page a name like “Home”, “Homepage”, or “Front page”.

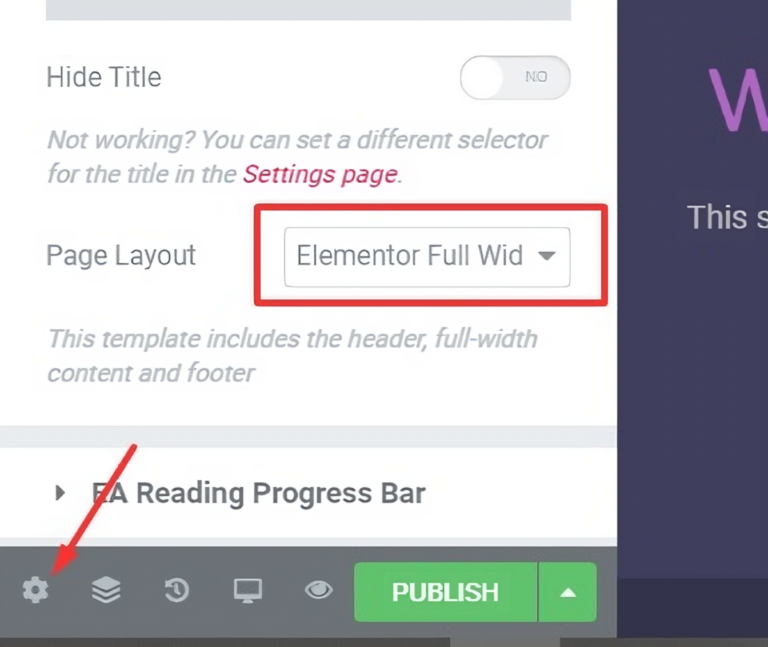
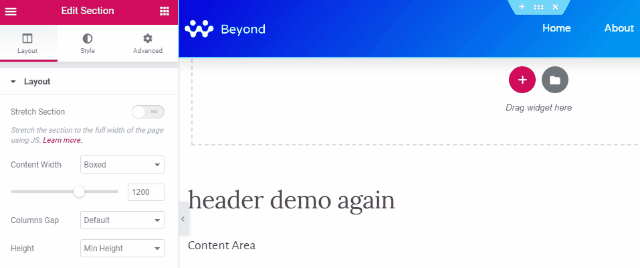
Set the page layout by clicking the gear icon on the bottom-left corner on the left panel. Set the page layout to Elementor Full Width.
![]()
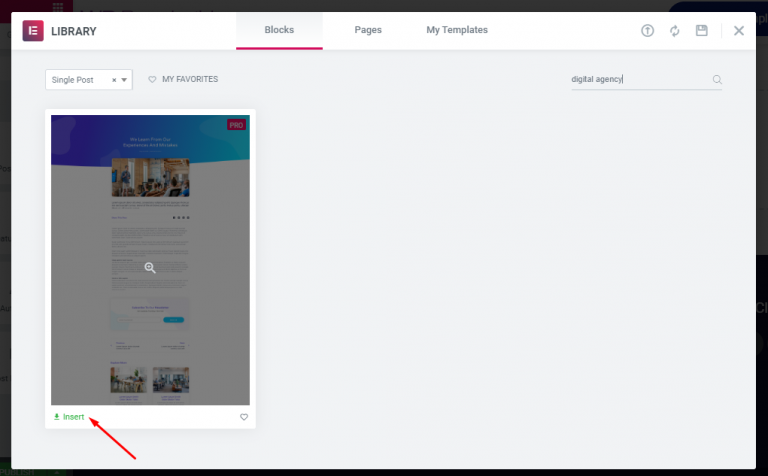
Since we want to create the website from the Digital Agency template kit, Click the folder icon on the canvas area to import the homepage template of the Digital Agency template kit.
Enter “Digital Agency” in the search box under the Pages tab of the template library, Then choose the homepage template. To open it in the Elementor editor, Click the Insert button.

By substituting your own content for the default, You can customize the content. Each widget can be edited by clicking it, After which you can edit the content in the left panel. A widget enters an editing mode when clicked.

After customizing the content, Publish the page by clicking the PUBLISH button on the left side. Additionally, You can see a preview of it by selecting the eye icon.
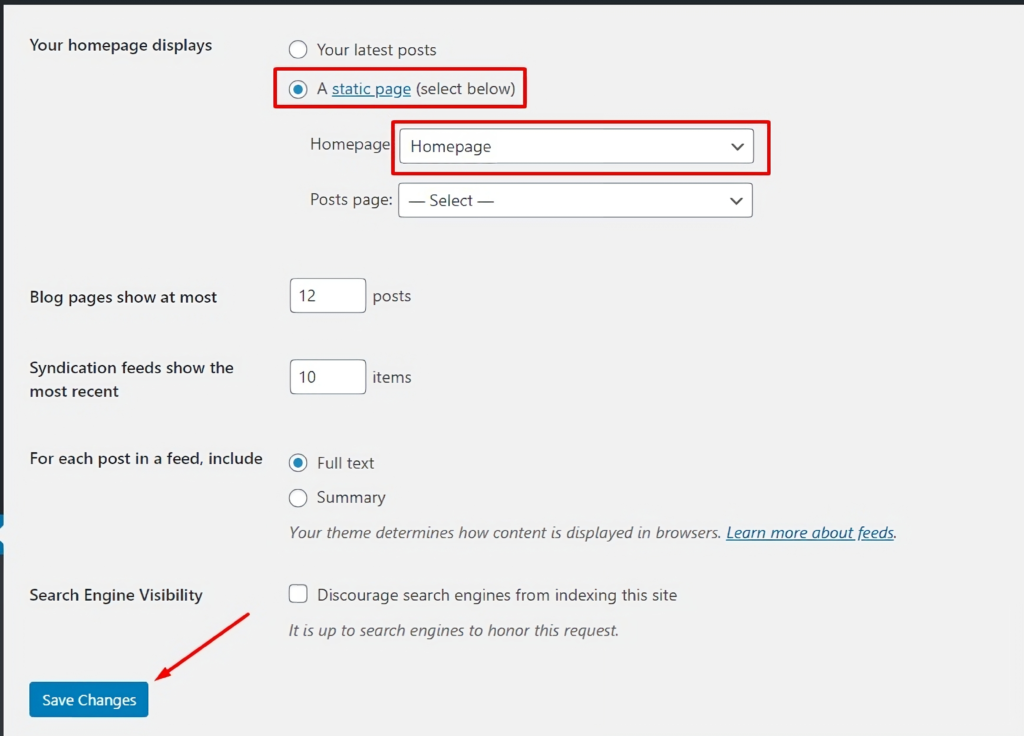
After publishing your Homepage, Navigate to Settings -> Reading. Select the newly created homepage from the dropdown menu, Change the homepage display setting to a static page, And then click the Save Changes button.
About Page
Edit a new page with Elementor by selecting Pages -> Add New. You may name this page “About” or “About us.” In the left panel, Click the gear icon to change the page layout to Elementor Full Width.
On the canvas area, Click the folder icon. Enter “Digital Agency” in the search box under the Pages tab. To open the about page in the Elementor Editor, Select it and press the Insert button.

Tailor the content as you did on the homepage and publish the page.
Contact Page
Make a new page and use Elementor to edit it. You may call this page “Contact” or “Contact us.” Elementor Full Width should be selected as the page layout.

To access the template library, Click the folder icon on the canvas area. Enter “Digital Agency” in the search box under the Pages tab of the template library. To access the contact page in the Elementor editor, Select it and press the Insert button.

Tailor the content. Once done, Publish the page
Clients Page
The clients that your business has worked with are displayed on the Clients page. Make a new page and use Elementor to edit it. Name this page “Clients” or “Happy Clients,” For example. Elementor Full Width should be selected as the page layout.
To access the template library, Click the folder icon on the canvas area. Enter “Digital Agency” in the search box under the Pages tab. To open the Clients page in the Elementor editor, Select it and click the Insert button.

Tailor the content. Once done, Publish the page.
Services Page
The services that your business provides are listed on the Services page. Make a new page and use Elementor to edit it. Name this page “Services” or “Our Services,” For example. Elementor Full Width should be selected as the page layout.
To access the template library, Click the folder icon on the canvas area. Enter “Digital Agency” on the Pages tab. To access the Services page in the Elementor editor, Select it and press the Insert button.

Customize the content. After finishing, Publish the page.
Create the Theme Parts
If you’ve ever noticed, Most WordPress themes consist of the following parts
Header
Footer
404 Page
Single Post Template
Depending on how complicated the theme is, Some may contain additional components. The elements above can be created using Elementor’s theme builder tool, and We shall do so for the website we are building. A popup and a template for a single post will also be made.

Header
The site logo and the primary menu will be placed in the header. You must first establish a menu before you can begin to create the header. Navigate to Appearances -> Menu to do this. To build a new menu, Click the link labeled “Create a New Menu.”

Give your new menu a name and click the Create Menu button.

On the Add menu items section, Add the items to your menu. To your menu, you can add Pages, Posts, Categories, or Custom URLs. Simply check the menu items you want to include and click the Add to Menu button. Include the pages you created earlier. To save your new menu, Don’t forget to click the Save Menu option.

Once done creating the menu, Go to Templates -> Theme Builder. On the Theme Builder screen, Click the Header tab on the left panel and click the Add New button to create a new header.
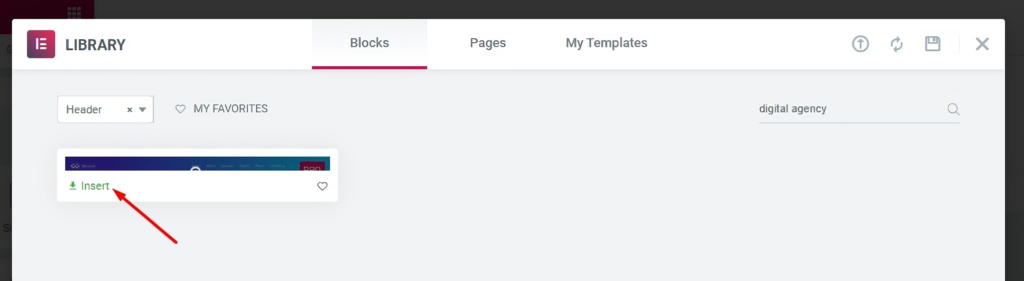
Enter “Digital Agency” in the search box under the Blocks tab of the template library window to get the header of the Digital Agency template kit. To open it in the Elementor editor, Click the Insert button.
Replace the website’s default logo with your own. Click the Image widget to enter editing mode in order to do this. Utilize the image selector on the left panel to upload your logo.

Next, Replace the default menu with the menu you have just created. To do so, Click the Nav Menu widget to turn it into an editing mode. Select your menu from the dropdown menu on the Menu section on the left panel.

Simply right-click on the phone number in the header and choose Delete to remove it.

Click the PUBLISH button on the bottom side on the left panel to publish your header. You will be asked to set the display condition. Simply click the ADD CONDITION button to set the display condition.

Your header template will automatically be used for the entire website. Simply click the SAVE & CLOSE button if you want your header template to be used for the entire website. Instead, Choose the page(s) or post(s) from the dropdown menu and press the SAVE & CLOSE button before choosing the page(s) or post(s) to which your header should be applied.
Footer
Same as the header, You can go to Templates -> Theme Builder to create the footer. Go to the Footer tab on the left panel and click the Add New button to create a new footer.
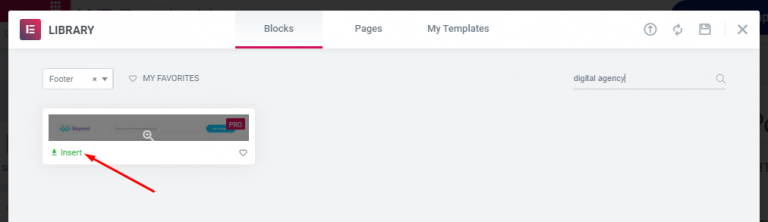
Enter “Digital Agency” in the search box under the Blocks tab of the template library window to get the footer of the Digital Agency template kit. To open it in the Elementor editor, Click the Insert button.

Scroll your mouse to the bottom if you can’t see the footer template. The site logo, an email subscription form, and Symbols for social networking are all included in the footer of the Digital Agency template package.
Just as you did with the header template above, Change the site’s default logo. Edit the social media icon URLs after that. Click the Icon List widget to enter editing mode in order to do this. On the left panel, Type the URL for each social media site.
To edit the settings, Click the Form widget to put it in editing mode. Mailchimp, MailerLite, and GetResponse are just a few of the email marketing services that Elementor supports connection with. To find out more about integrating Elementor with an email marketing solution, See this post.
To publish your footer template, Click the PUBLISH button, And to specify the display condition, Click the ADD CONDITION button. Your footer template will automatically be used throughout the entire site, Just like the header. Select the page(s) or post(s) you want to apply your footer template to from the dropdown menu, Then click the SAVE & PUBLISH button.
404 Page
Go to Templates -> Theme Builder to build the 404 page. Select the Add New button on the Error 404 tab in the left panel of the Theme Builder screen.

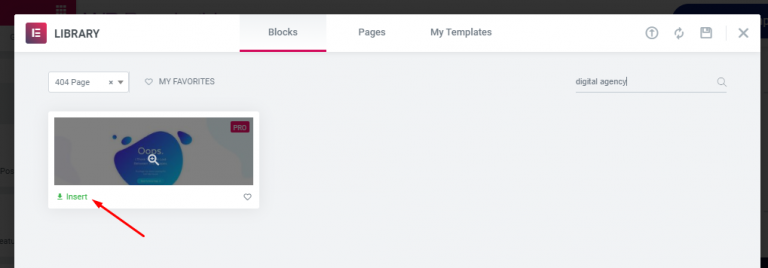
Under the Blocks tab on the template library, Type “Digital Agency” on the search box to find the 404 page of the Digital Agency template kit. Click the Insert button to open it in the Elementor editor.

Click the PUBLISH button and set the display condition. Make sure to select 404 Page and click the SAVE & PUBLISH button.
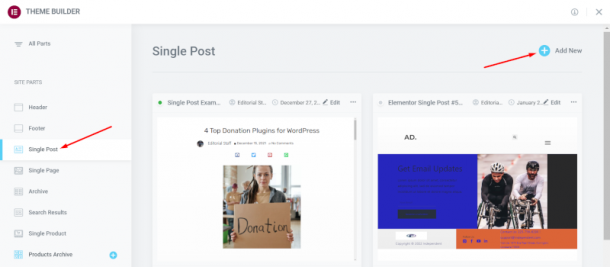
Single Post Template
To build the Single Post Template, Navigate to Templates -> Theme Builder. Click the Add New button on the Single Post tab in the left side of the Theme Builder page.
Enter “Digital Agency” in the search box under the Blocks tab of the template library window to get the single post template from the Digital Agency template kit. To enter the Elementor editor, Click the Insert button.
Set the display condition and press the PUBLISH button. This template will automatically be used for the entire website. Additionally, This implies that every time you write a new blog post, It will be published using this single post template. Simply choose the category from the dropdown menu before pressing the SAVE & CLOSE button if you want to use the single post template for a particular category for some reason.
News Page
The most recent blog articles on your website will be displayed on the News page. If you’d like, You may give this page any name. “Blog,” as an example.
Go to Templates -> Theme Builder to build this page. Click the Add New button under the Archive tab on the left panel.

To discover the archive page of the Digital Agency template kit, Click the Blocks tab and type “Digital Agency” into the search box. To open it in the Elementor editor, Click the Insert button.
Click the PUBLISH button and set the display condition. You can control the archive types that appear on this page by setting the display condition. For instance, If you want to display the posts archive only, You can set the display condition to Posts Archive. And click the SAVE & CLOSE button.
Popup
You’ll note that the bottom-left corner of each page template in the Digital Agency template kit has an emblem of an envelope on it. This icon is used to show the template kit popup. The purpose of the popup itself is to gather contact information from potential customers. You may easily remove the envelope icon from each page template if you don’t require this popup.

Conversely, If you want to use the popup, You can create the popup first. To do so, Go to Templates -> Popups. Click the Add New button, Give your popup a name and click the CREATE TEMPLATE button.

To discover the Popup template from the Digital Agency template package, Click the Popups tab and type “Digital Agency” into the search box. To open it in the Elementor editor, Click the Insert button.

Click the PUBLISH button. On the appearing popup, Click the NEXT button to set the trigger.

We will use the on-click trigger to display the popup so enable the On Click option and click SAVE & CLOSE.

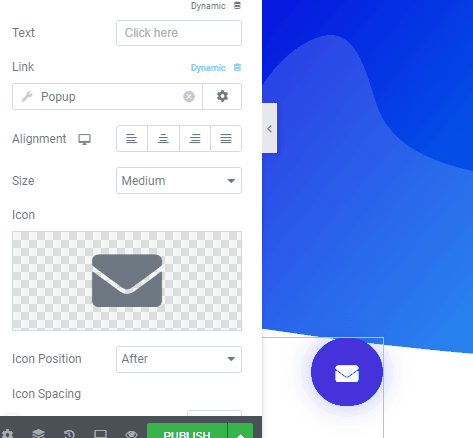
You can now use your popup. The next step is to use Elementor to edit one of the pages you have established, Such as the Homepage, About page, Contact page, Services page, or Clients page. Click the envelope symbol to enter editing mode. Select the popup you just created by clicking the wrench icon in the Link section.
Refresh the page. On additional pages where you want the popup to Appear, Repeat these steps.
Congratulations! Your website was just recently made.
The Bottom Line
A fantastic page builder for WordPress websites is Elementor. Even though you can use it for free, There are lots of other benefits to using the commercial version. The pro edition of Elementor has a popup builder that lets you make popups without using an additional plugin, A theme builder that lets you design WordPress themes without knowing any code, and Many more capabilities. You have access to more widgets and templates with the pro version as well.